Mechanical Testing
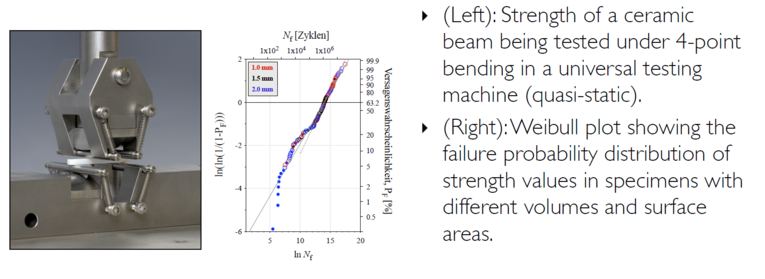
Flexural Strength
- It measures the critical outer fibre stress in bending necessary for the largest defect in a specimen volume and surface to reach the critical stress intensity factor.
- A test series contain preferably >30 specimens in order to sample the defect size distribution of the parent defect population, resulting in a distribution of strength.
- Whether in uniaxial or biaxial stress, the distribution of strength values is analysed using Weibull statistics to obtain the Weibull modulus and the characteristic strength.
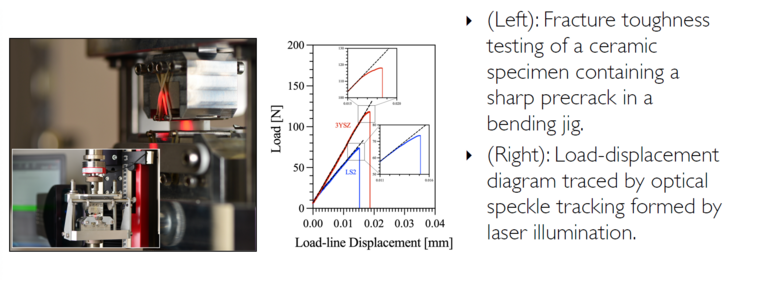
Fracture Toughness
- Is the critical stress intensity factor, or KIc, relating the strength to the critical crack size, through the Griffith-Irwin relation.
- It is obtained through the strength testing of a specimen containing a crack with a defined size and geometry.
- The crack geometry function is particular to each specific test configuration, loading condition, crack shape and size relative to the thickness of the specimen.
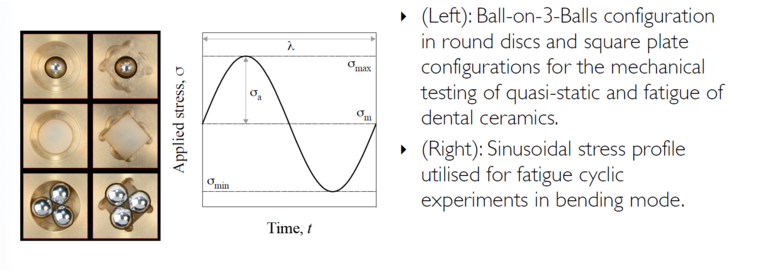
Subcritical Crack Growth (Fatigue)
- It characterizes the susceptibility of a material to undergo crack growth when subjected to a stress level below the critical stress for quasi-static fracture.
- It can have a chemical nature, such as through the corrosive action of water on oxide bonds, or purely mechanical, by the degradation of toughening mechanisms.
- It is tested using strength tests under different conditions: dynamic, static or cyclic loading, yielding the fatigue exponent n and crack velocity relations.
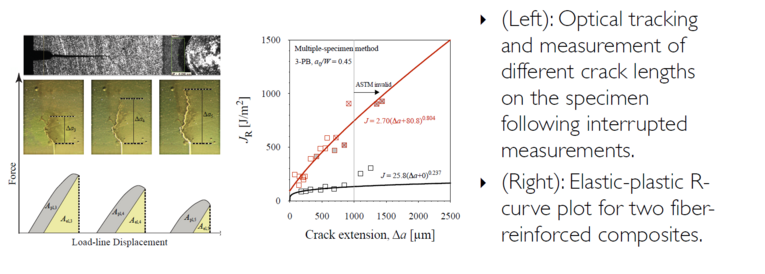
R-Curve Behavior
- Occurs in materials where the fracture toughness is not a single material property, but it rather increases during the extension of a crack.
- It is mostly induced by microstructural features as opposed to amorphous materials, in which crystals, particles, fibers, etc. induce shielding mechanisms.
- It is tested using fracture toughness tests by tracking the crack extension during loading, using optical or compliance techniques.
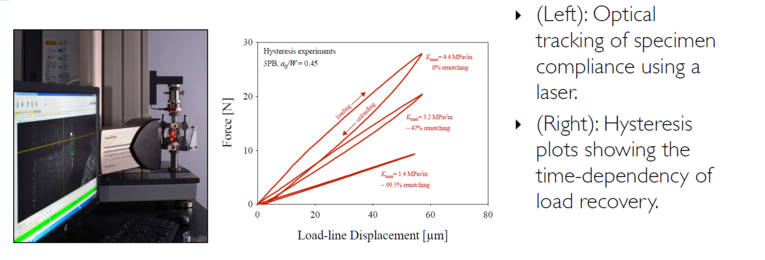
Hysteresis
- Is a mechanical behaviour characterised by its time-dependency on the strain, when the elastic recovery has a time delay.
- It is mostly present in viscoelastic materials, but can also be induced in ceramics by the action of frictional elements that oppose crack closing.
- It is tested using typical tension or bending tests below the critical stress by loading and unloading, needing an accurate measurement of the specimen’s compliance.
Bench-Testing
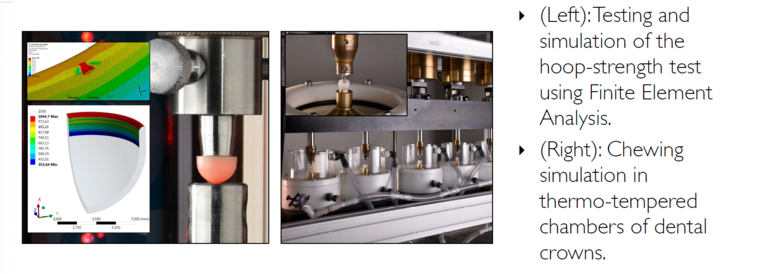
- Are non-standardised mechanical tests that incorporate aspects relevant to the real-life application, by modifying loading configurations, test parameters and geometry.
- They deliver behaviors that may be easier to relate to application scenarios, but tend to be more phenomenological and less formalized.
- Most bench-tests in dental materials take the form of chewing simulation or strength tests using specimens with geometries analogous to dental prostheses.
Ceramics / Glass Lab
Glass Oxide Synthesis
- Glasses are composed of one, two (binary), three (ternary) or multiple oxides
- containing at least one network former (such as SiO2, B2O3, GeO2, etc.).
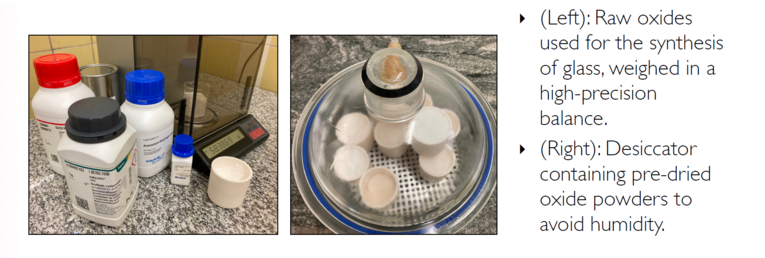
- The raw oxides must be dried at specific temperatures and kept in desiccators.
- The desired amounts in mol% are weighed, mixed and brought to Pt-crucibles.
- Non-purified oxides, such as carbonates (Li2CO3), must go through a decarbonization heat-treatment prior to the final melting temperature.
Glass Melting
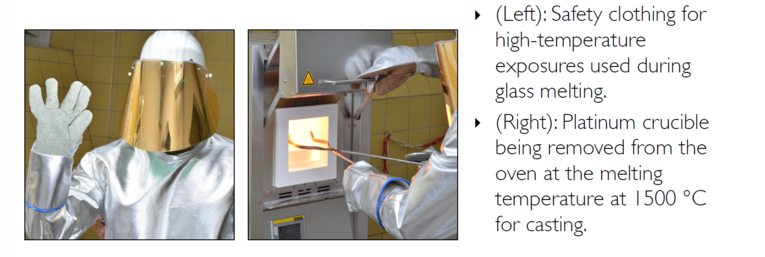
- After decarbonization in the oven at bout 900 °C, the temperature is increased to 1400 °C - 1600 °C for the oxides to enter the liquid state, to about 0.5 - 2 h.
- Depending on the melting temperature and oxide reactivity, the glass can be melted in Pt-crucibles (up to 1500 °C) or need Pt-Rh crucibles (up to 1650 °C).
- Some glasses may contain volatile elements that may be lost, so that a lid may need to be used covering the crucible to prevent gas escaping.
Quenching / Splat-Cooling
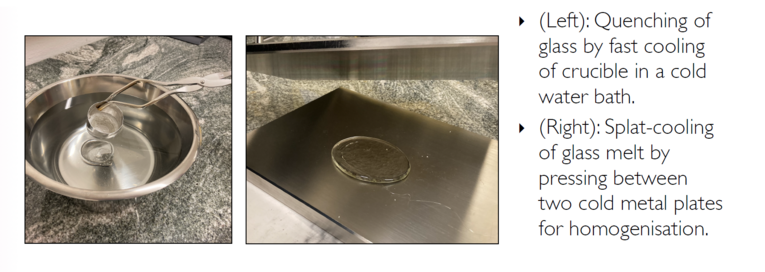
- Because a glass is a mixture of different oxides, it must be well homogenised so to obtain a uniform glass structure after the final casting.
- One way to assure the homogeneity of the glass is to perform multiple (2-3x) quenching of the melt, whether in water or on a cold steel surface.
- In that process, the glass solidifies very fast and fractures due to thermal stresses. The pieces can be milled to a powder or not, and go through several further melts.
Glass Casting
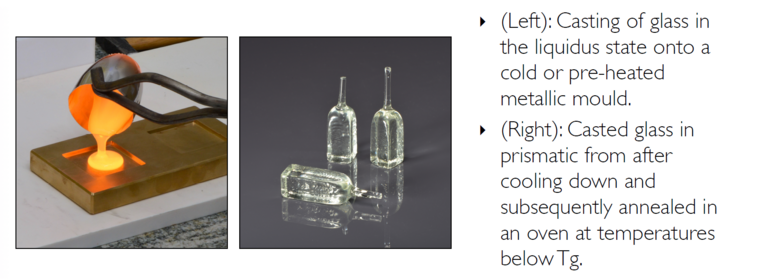
- The casting temperature is determined mainly by the viscosity of the melt, which has to be low enough to flow from the crucible before it cools down.
- The crucible is removed from the oven with a pair of pliers and quickly poured onto a mould made out or brass or graphite having the desired from.
- The glass must cool down rapidly in the mould to avoid spontaneous crystallization, but be removed right before the glass transition temperature into an annealing oven.
Nucleation / Crystal Growth
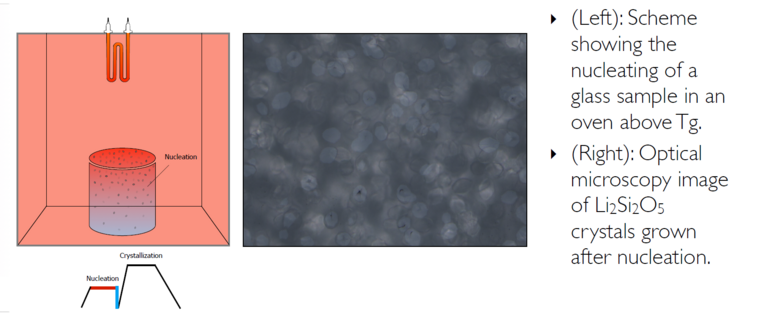
- Over a small temperature range above the glass transition temperature (Tg), the glass structure at the molecular assume a crystalline structure in form of small nuclei.
- The longer the glass stays within the nucleation range, the higher is the amount of nuclei that will later grow into crystals, forming a glass-ceramic.
- At a higher temperature range, the higher molecular mobility predisposes atomic migration from the glass towards the nuclei’s interface, leading to crystal growth.
Injection-Moulding / Sintering
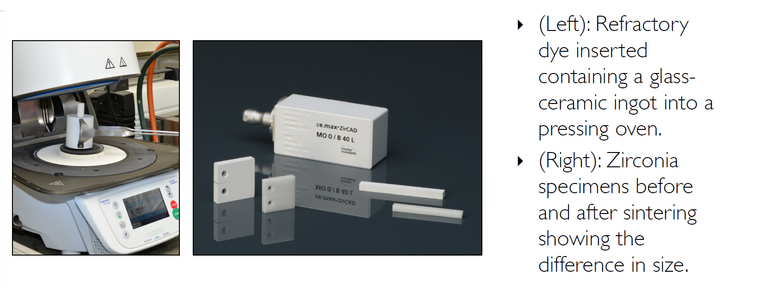
- Some glass-ceramics must undergo a injection-moulding process, where they are heated-up and the melt is pressed into a negative form in a refractory dye.
- Sintering is the process where a material powder fuses together without liquefaction, only by mass transport at the surface of the touching particles.
- The most typical material in dentistry that undergoes sintering is zirconia, which is sintered in two stages, into a machinable white-body and later to full density.
Sample Preparation
Serial Sectioning
- For the measurements of physical and mechanical properties, specimens must comply to specific geometries defined by the literature or testing standards.
- Commonly, materials are produced in larger volumes or supplied by manufacturers in pre-fabricated shapes that must be processed to the desired size and geometry.
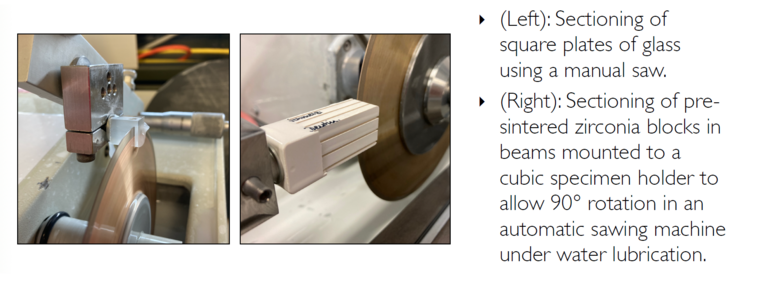
- Serial sectioning is done with the aid of manual or automatic saws that cut materials with low-speed diamond-coated copper discs, whether dry or under water lubrication.
Machining
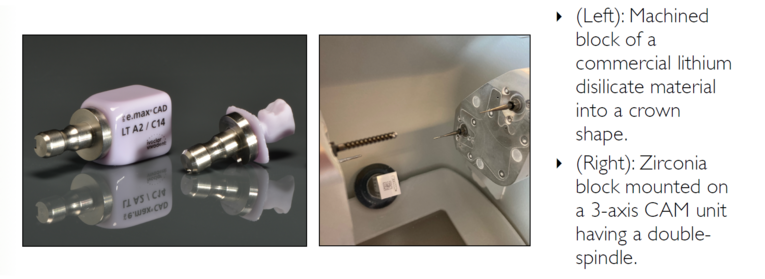
- Machining is the process of shaping ceramic materials via a subtractive route, following the Computer-Aided-Design/Computer-Aided-Machining (CAD/CAM) technology.
- Burs of several shapes and diamond sizes are mounted in CAM machines that work around 3 to 5 axes to grind pre-fabricated blocks of blanks to the desired shape.
- CAM machines are used to grind commercial materials to anatomical prosthetic shapes for bench-testing or simplified geometries using exported STL files.
Surface Grinding and Polishing
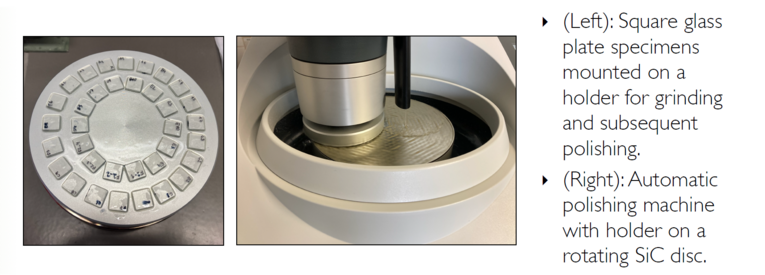
- The procedure of grinding is meant to remove large amounts of material in the z-plane while maintaining the grinded surface parallel to the lower surface plane.
- Rotary grinding machines use diamond wheels of different grades employed depending on the amount of subtraction, type of material and severity of surface damage.
- Manual or automatic polishing machines use SiC papers or discs followed by cloths used in conjunction of oxide suspensions of varying particle sizes.
Acid Etching
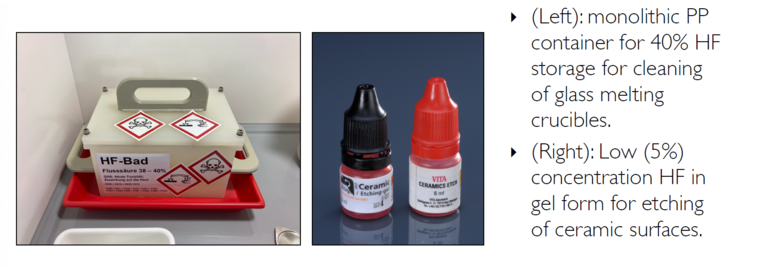
- Etching procedures are done for two purposes: (i) for revealing microstructural elements in glass-ceramics and (ii) cleaning platinum crucibles used for glass melting.
- Hydrofluoric (HF) acid is used to dissolve SiO2-based glasses in various concentrations, from 0.5% for surface etching up to 40% for cleaning platinum crucibles.
- In high concentrations, HF must be stored safely in Polytetrafluoroethylene or Polypropylene containers inside fume hoods with constant vapour suction.
Moulding / Shaping / Notching
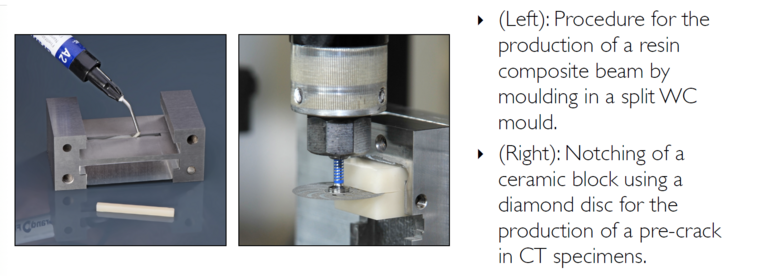
- In order to produce samples with a desired geometry, specimens can be shaped by moulding of viscous materials or shaping of solids by cutting and grinding.
- Resin composites are inserted in sliced moulds made of teflon or tungsten carbide having plasma eroded surface for perfect finish.
- Notching is the procedure of producing a starter pre-crack or to constrain the crosssection during the fabrication of fracture toughness specimens.
Powder Compaction
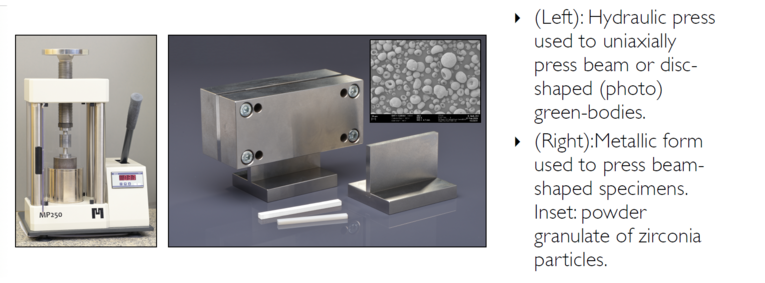
- Oxide ceramics are produced by compaction of powder granulates under uniaxial pressing followed by cold isostatic pressing.
- Powder compacts are called green-bodies that will be subsequently sintered aiming for increasing densification and grain growth.
- For the production of discs and beam-shaped specimens, hardened metallic forms are used under an hydraulic press to up to 100 MPa.
Analytics
Differential Scanning Calorimetry
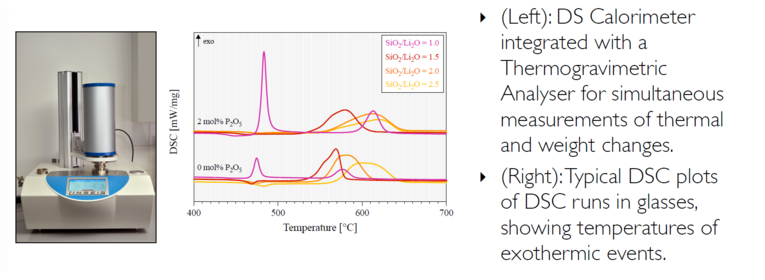
- Thermoanalytical tool utilised to measure the amount of heat difference required to increase the temperature of a sample and a reference crucible.
- Is used to detect phase transitions, such as crystallization or melting of glasses, which
- will set free thermal energy (exothermic) or consume heat (endothermic).
- Valuable in determining transition temperatures and enthalpies, thus having great applicability in the construction of phase diagrams.
Thermogravimetry
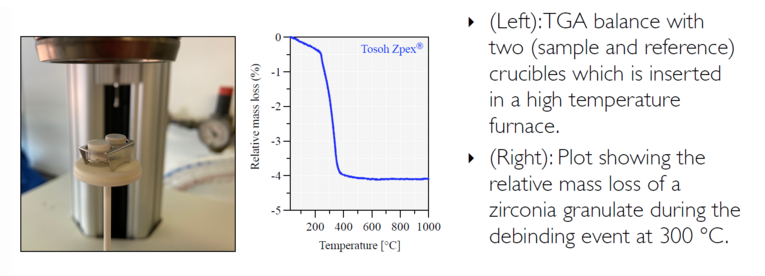
- Coupled to a DSC, a Thermogravimetric Analyser measures precise changes in mass taking place during temperature changes by way of a very sensitive balance.
- It is used to measure mass changes during phase transitions, absorption, adsorption, desorption and thermal decompositions.
- Can be performed in several atmospheres, such as vacuum, air or nitrogen gas, to quantify, for example, water evaporation and debinding temperatures.
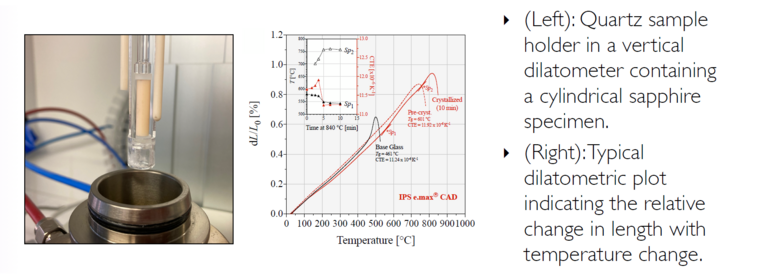
Linear Dilatometry
- Instrument that combines a very accurate strain gage with a high temperature controllable furnace for measuring changes in physical dimensions with temperature.
- It is used to measure thermal properties such as the linear thermal expansion of materials during heating or cooling schedules.
- It is capable of detecting phase changes such as the glass transition temperature in glasses, along with the melting point due to softening.
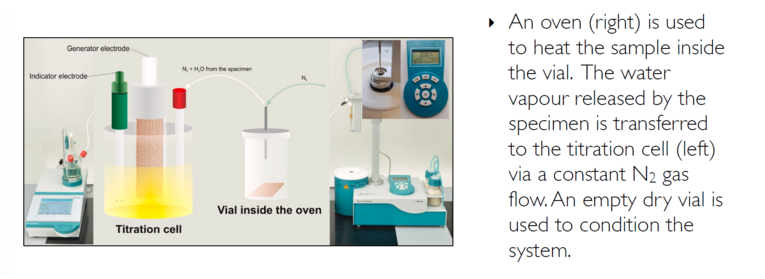
Coulometric Titration
- Karl-Fischer titration is a chemical method used to determine very precise trace amounts of water in a sample based on the oxidation of sulfur dioxide by iodine.
- The titration cell contains a cathode immersed in the anode solution separated by an ion-permeable membrane.
- One mole of I2 is consumed for each mole of H2O, with the equivalence point detected by a bipotentiometric titration.
Rheology
- Rheology deals with the deformation and flow of solid and liquid materials to establish their behaviour under the action of a force.
- It is used to characterise the flow of materials (and its change under stress) so to measure parameters such as viscosity, loss and storage moduli.
- A rheometer uses rotational and oscillating displacements under controlled strain rates to measure the resistance with time or temperature, for example, during setting.
Volumetric Mass Density
- The measurement of density (specific mass) reflects its mass per unit volume, and is usually done by hydrostatic weighing in a very precise balance.
- Its uses Archimede’s principle, which states that the buyoant force that is exerted on a body immersed in a fluid equals the weight of the fluid displaced by that body.
- The measurement using Archimedes’ principle requires a special balance with an arm that measures the weight of the material in a container holding the liquid.
Microscopy
Optical Microscopy
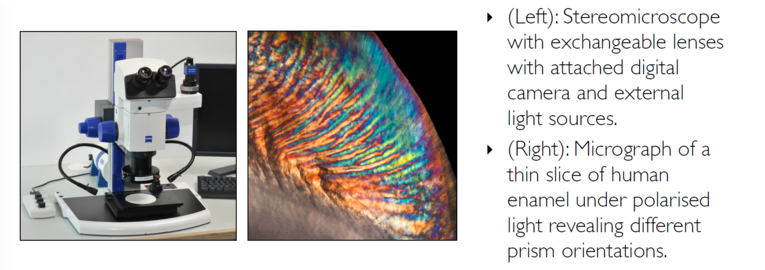
- Uses a system of lenses and visible light to illuminate and provide a close-up view of objects, revealing structural and topographical details out of reach to the naked eye.
- Usually refers to microscopes in which the image is rendered purely by the lens system and not otherwise processed by a computer program (digital microscopy).
- In most current light and stereo microscopes, a mirror system allows the feeding into a digital camera, which then separately digitises the image into a processing software.
Confocal Laser Scanning Microscopy
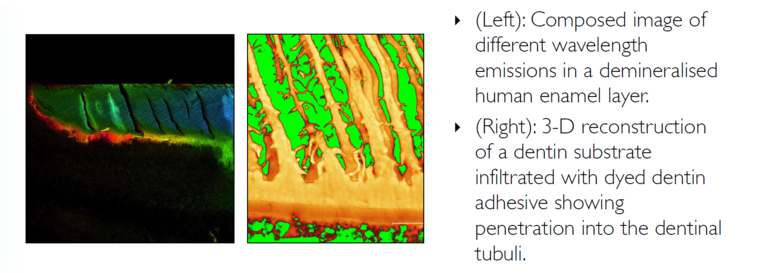
- Refers to an imaging technique that uses one or several Laser beams of different wavelengths to illuminate the sample at a very narrow focal plane.
- It is often combined with an optical microscope used in different modes; the automated to focus allows for the stage to be moved to successive confocal planes.
- The samples are usually dyed with fluorescent molecules that emit light in the wavelength excited by the laser, commonly used for biological tissues.
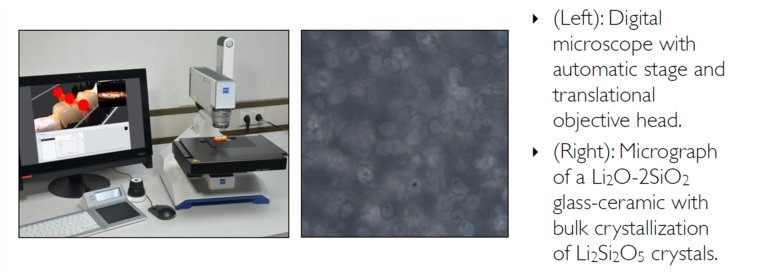
Digital Microscopy
- Microscopes that utilize physical lenses for image acquisition but forego ocular objectives, rendering images that are automatically digitised.
- Modern digital microscopes are fully operated through a digital interface, such a thorough touch-pads and joysticks, while programmable tasks are fully automated.
- Electronic features, such as automated x-y-z tables and swing arms allow for two- and three-dimensional mapping and reconstruction of surface topography.
Non-contact Profilometry
- Uses confocal white light sensors to create two-dimensional height profiles and threedimensional topographical maps for advances surface metrology applications.
- Works on the principle of white light interferometry to obtain data of x, y, z coordinates of each surface point.
- With a resolution down to a few nanometers, it finds use for accurate surface metrology and measurements of volumetric change when compared to a reference.
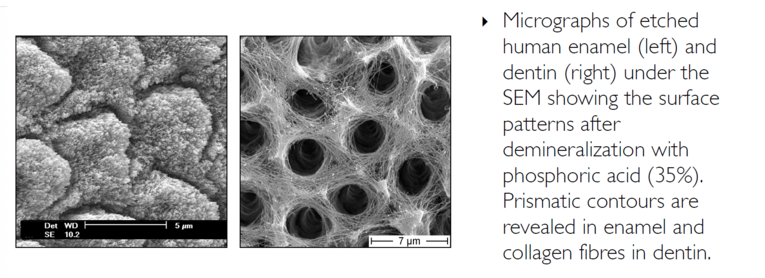
Scanning Electron Microscopy
- Is based on the bombardment of a sample by a focused beam of electrons, which interact with atoms at the volume of the sample giving different signals.
- The most common interactions yield secondary electrons and elastic back-scattered electrons and X-ray emission, the latter allowing for atomic characterization.
- Since the sample has to conduct electrons, the metallisation of the sample’s surface is usually the preferred preparation method (such as with gold, palladium, carbon etc.).
Fractography
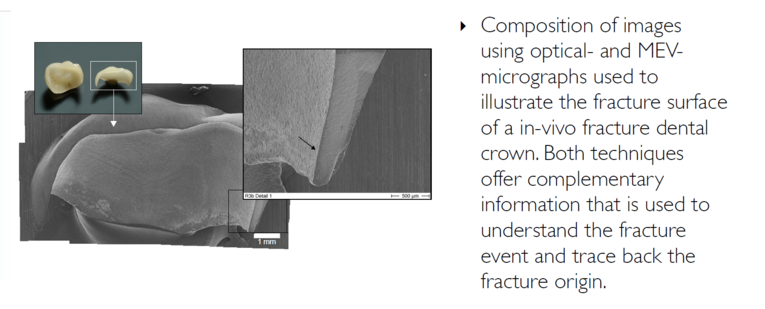
- Is the technique of fracture surface analysis used in forensic engineering aimed to assess crack paths, surface markings, stress states in the piece and failure origins.
- Relies on the ability of a trained forensic fractographer to „read“ the fracture surface and identify fractographic features that give information on fracture events.
- Uses complementary microscopy techniques such as optical microscopy, surface metrology, scanning electron microscopy so to reach a failure diagnosis.

